
Clear and Simple Steps for Photoshopping an Image from MEH to WOW
- Deena Englard

- May 11, 2021
- 4 min read
Updated: Jul 4, 2021
Sometimes you just don’t have a professional photographer or equipment available but you still need to use a photo of that product in your design.
Follow along with these simple steps as we convert a not-so-great image into a great-looking ad.
Download the original photo here to perform these edits in Photoshop yourself.
If you don't have Creative Cloud, you can start a free 7-day trial or purchase a 1-year subscription to Adobe Photoshop or the full Creative Cloud suite.

Stage 1: Basic Image Adjustments
We start with some basic adjustments to improve the overall image, the same as we would do to any photo.
Step 1. Mask the washing cup

Using the pen tool, create a path around the washing cup. Once the path is closed, go to the Paths panel (it’s usually located next to the Layers panel. If not then go on top to Windows and select Paths) and Command/Control click the path layer to select the path. Go back to your Layers panel and click the Create Mask icon on the bottom of the panel to create a layer mask around your washing cup.
Step 2. Sharpening

Use the keyboard shortcut, Control/Command + J to duplicate the image layer. Go on top to Filter → Other → High Pass and select a radius of around 4. Then change your layer mode to Linear Light (or you can use Overlay or Soft Light for different strengths and effects) and lower your layer opacity to a level that makes your image sharper without looking over-sharpened and fake. Here I chose 53%. Feel free to play around with the radius levels, layer modes and layer opacity to create an effect you feel comfortable with.
Step 3. Adjusting the Lighting

Add a Levels adjustment layer and adjust the lights and darks to increase the contrast to your liking.
Step 4. Adjusting the Coloring

Add a Color Balance adjustment layer and tweak the coloring to make the image less yellow/orange and more natural-looking. I moved the Cyan slider to -6, Green to +5 and Blue to +11 but feel free to play around and use coloring that you feel comfortable with.
Step 5. Increase the Saturation

This step is totally optional. I added +20 to the Vibrancy and +9 to the Saturation to increase the color depth of the image.
Stage 2: Perfecting the Cup
Next we add layers to perfect the cup itself and make sure the product looks its best.
Step 6. Healing
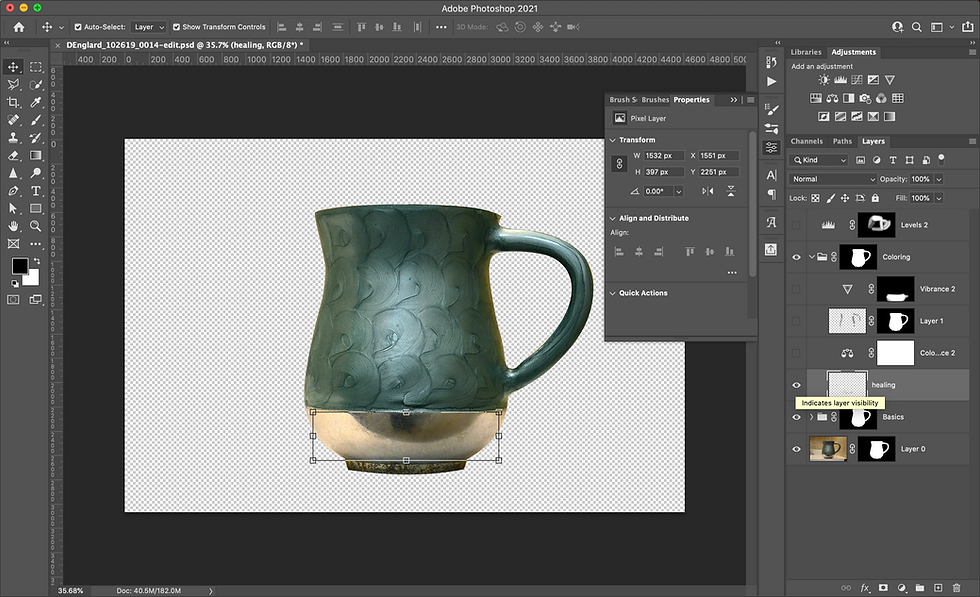
Create a new blank layer and use the Spot Healing Brush to remove any unsightly blemishes to the cup. The trick to this step is not to go overboard - some blemishes are natural and help the audience to understand that this is a photo of a real item and not just a rendering. So try not to spot heal to the point where the photo doesn’t look real anymore or looks oddly distorted.
Step 7. Adjusting the Coloring (Again)

If you did this perfectly the first time around, then good for you! You can skip this step. But I find that it’s always helpful to come back and reevaluate the coloring as you go along to make sure that you’re happy with it. At this point I decided that the image was still too yellow and added even more Cyan and Blue and also some Magenta to warm it up a little.
Step 8. The Handle

You’ll notice that there’s a lot of glare and some yellow reflections from the surrounding tiles around the cup’s handle. To remove these, I created a new blank layer, ink-dropped the green color from the cup and painted in the areas that were yellow or white. You can keep adjusting your brush color to imitate the areas surrounding where you are painting.
Another option would be to use the Clone Stamp tool to recreate the pattern in the rest of the cup in those areas that need to be covered. Feel free to try out both methods and see which results you prefer. You can also decrease or increase the opacity of the cover-up layer as you see fit. When you’re done painting or stamping, Alt+drag the mask from your cup onto this handle layer so that your painting doesn’t go off of the cup.
Step 9. Desaturate the Metal

In this step the goal is to remove the yellow reflections in the metal foot of the cup and create a more neutral color. To achieve this I added a new Saturation Adjustment layer and moved the Saturation slider down to -66. I then masked the Saturation layer to only include the metal foot of the cup.
Step 10. Final Tweaks

At this point it’s time to tweak the levels to create more even lighting across the cup. Create a Levels adjustment layer and brighten the image. Fill the layer mask with black to remove the effect and then paint it back in on just the darker parts of the cup to brighten them and make them more consistent with the rest of the image.
And you’re done!
The best part is then grouping all of the adjustments into 1 folder and turning them on and off to see the before and after - that’s when you can really see how much hard work went into this image. Give yourself a pat on the back and place your beautiful image into your ad with confidence.


